Claim Parties Widget
In This Topic...
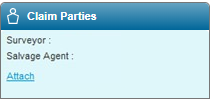
The Claim Parties widget displays the various parties associated to the claim.
Each company is identified by the name of the Party and the Party Role. Click a link to view the claim party. The Claim Parties window opens.
| Company Type | Optionally select the Company Type to filter the results listed in the below Party drop-down field. |
|
Displays the name of the claim party, as well as the Party Type, location details, and Associated Company (if applicable). |
|
|
Displays the role of the selected party. |
|
|
An external claim number can be provided as a reference for the claim party. |
|
| Enable Scheduled Claim Payments | This field is only displayed if Scheduled Claim Payments have been enabled in the claims General Settings Menu. Check this checkbox to enable scheduled claim payments for this Claim Party. |
|
Warning: To terminate a scheduled claim payment configuration, uncheck the Enable Scheduled Claim Payments checkbox . If scheduled payments is re-enabled for the Claim Party in the future, the system retroactively generates claim payment records according to the setting defined in the Frequency field unless the Next Payment Date field in the Scheduled Claim Payment Criteria panel is modified. |
Click Save & Close to save the changes and close the window or click Close to close the window without saving.
Click Edit Party to make changes to the Claim Party entry for the party. Click here for more information.
Click Delete to remove the company from the claim.
Attaching a Claim Party
Click Attach in the Claim Parties widget to add a claim party. The Claim Parties window opens.
|
Select a claim party to attach. Text can be entered into the field to search by name, Party Type, location details, or Associated Company. |
|
|
An external claim number can be provided as a reference for the claim party. |
|
| Enable Scheduled Claim Payments | This field is only displayed if Scheduled Claim Payments have been enabled in the claims General Settings Menu. Check this checkbox to enable scheduled claim payments for this Claim Party. |
|
Warning: To terminate a scheduled claim payment configuration, uncheck the Enable Scheduled Claim Payments checkbox . If scheduled payments is re-enabled for the Claim Party in the future, the system retroactively generates claim payment records according to the setting defined in the Frequency field unless the Next Payment Date field in the Scheduled Claim Payment Criteria panel is modified. |
Notes:
Party Roles are configured and managed in the General Settings - Party Roles section.
Scheduled Claim Payments are configured and managed in the General Settings - Claim Payments section.
All data relating to the Claim Parties attached to each claim is aggregated in the Claim Party core system grid maintained through the OWClaimCommon Standard Container. For additional information, see
Click Add & New to save the details and clear the form to enter another party, click Add & Close to save and close the window, or click Close to close the window without saving the party.
Click Create New Party to create a new party to be attached to the claim. For additional information, see the Editing a Claim Party From Within a Claim section.
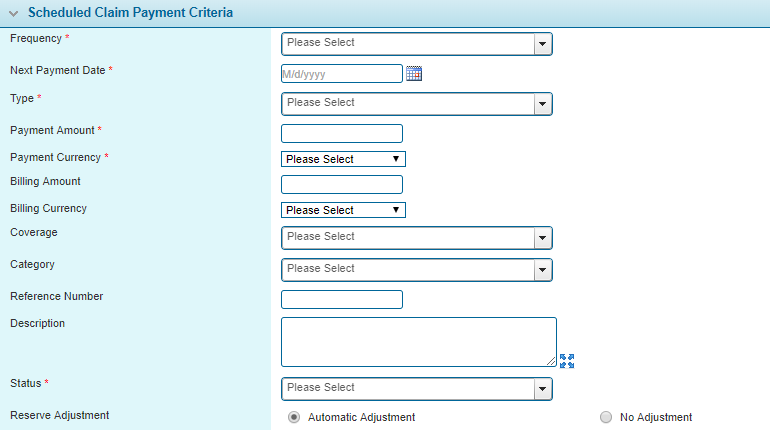
If Scheduled Claim Payments is enabled in the General Settings Menu, and the Enable Scheduled Claim Payments checkbox in the Attach Claim Party panel is checked, the Scheduled Claim Payment Criteria panel is displayed. Fields marked with a red asterisk * are required.
Only claims that have been attached to a policy are available for Scheduled Claim Payments. For additional information on selecting a policy, see the Claim Actions Widget section.
| Frequency | Select the frequency for the scheduled claim payment from the available options. |
| Next Payment Date | Enter the date for the next payment date, or select one from the date picker  . Once a scheduled payment date is reached and a payment is processed, the system automatically updates the Next Payment Date field according to the setting defined in the Frequency field. . Once a scheduled payment date is reached and a payment is processed, the system automatically updates the Next Payment Date field according to the setting defined in the Frequency field. |
|
Note: To temporarily disable a scheduled claim payment for a period of time, the Next Payment Date field must be modified to reflect the future payment date. |
|
| Type | Select the payment Type. The following options are available. |
| Payment Amount | Enter the amount of the scheduled claim payment. |
| Payment Currency | Select the Payment Currency. |
| Billing Amount | If the billing currency is different from the payment currency, enter the Billing Amount. |
| Billing Currency | If the billing currency is different from the payment currency, enter the Billing Currency. |
| Coverage | If a policy has been selected for the claim, a premium type from that policy can be associated to the payment. |
| Category | Select a claim payment category for the payment. |
|
Note: Claim Payment Categories are configured through a custom Option List. For additional information, see the Managing Option Lists for the Claims Workflow section. |
|
| Reference Number | Enter a reference number. |
| Description | Enter a description for the payment. |
| Status | Select the payment status. The following options are available. |
| Reserve Adjustment | Select the Reserve Adjustment setting. The following options are available. |
| The adjustment amount will be automatically deducted from the related reserve value. | |
| The related reserve or estimate value will not be changed. |
When this feature is enabled, the system first identifies claims that are eligible for scheduled payments based on the criteria set in the General Settings Menu. The system then creates claim payments for any Claim Parties that have a scheduled payment configuration with a Next Payment Date of less than or equal to the current date.
Payments are generated according to the settings defined in the Scheduled Claim Payment Criteria panel for each scheduled payment configuration. Once a payment is made, the Next Payment Date field is updated according to the setting defined in the Frequency field.
Note: In the unlikely event that a scheduled claim payment is not generated on a scheduled date, the Next Payment Date field is not updated. However, the next time a scheduled payment date is reached, the system retroactively generates claim payments for any missed payments. Once all payments are generated, the system automatically updates the Next Payment Date field according to the setting defined in the Frequency field.
Creating a New Claim Party From Within a Claim
- In the Claim Parties widget, click Attach. The Claim Parties window opens.
- Click Create New Party. The Claim Parties window opens.
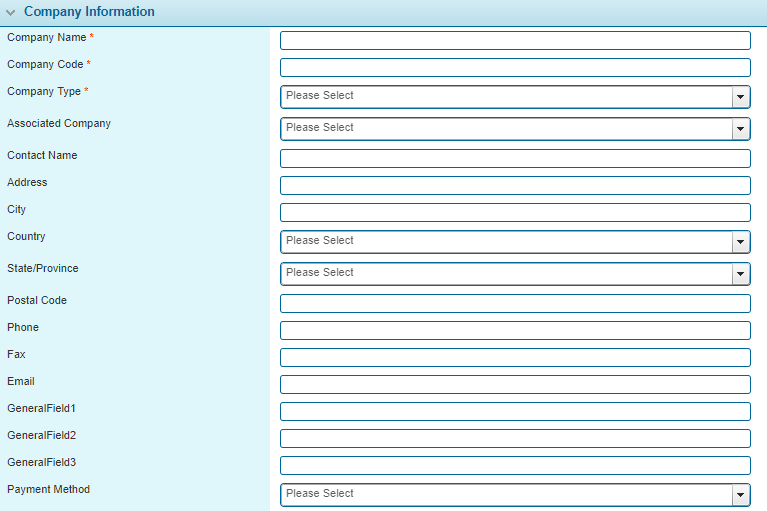
- Complete the necessary information. Fields marked with a red asterisk * are required.
- Click Add & Close to save the company and close the window, or click Close to close the window without saving the company.
- If the company was saved, it will be automatically selected in the Claim Parties window. Complete the remaining information and click Add & New to save the details and clear the form to enter another party, click Add & Close to save and close the window, or click Close to close the window without saving the party.
| Company Name | Enter the name of the company. |
| Company Code | Enter a code to identify the company. |
| Company Type | Select the company type from the list of industry presets. The following options are available. |
|
Note: The Additional Named Assured option defines the company as an assured for the purpose of indemnity payments. |
|
| Associated Company | Some companies may be subsidiaries or partners of other companies. Select the parent or primary company in the association. This association will be displayed when attaching companies to a claim. |
| Contact Name | Enter the name of the primary contact for the company. |
| Address and Contact Information | Enter the full address, phone and fax numbers, and email address for the company. |
| GeneralField1 / GeneralField2 / GeneralField3 | These fields can be used to enter any additional information related to the company. |
|
Note: Only General Fields that have been configured with a custom label are displayed. For additional information on the Custom Labels feature, see |
|
| Payment Method | Select the preferred payment method for this company. The following options are available. |
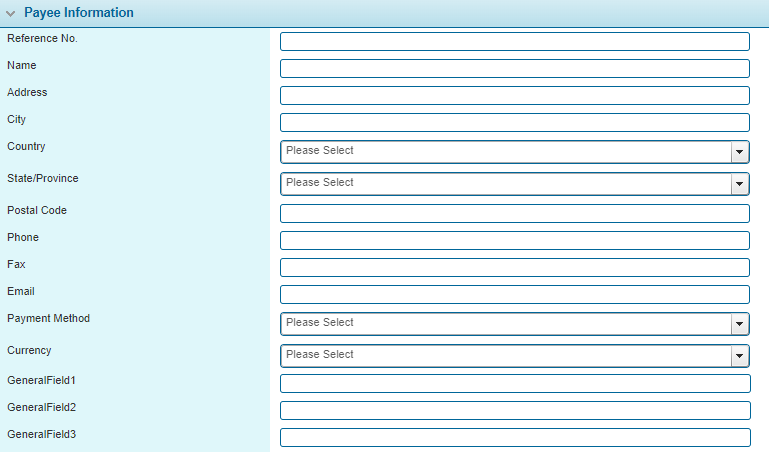
The Payee Information panel is displayed for users who have been assigned the appropriate security role(s).
| Reference No. | Enter a code to identify the payee. |
| Name | Enter the payee name. |
| Address and Contact Information | Enter the full address, phone and fax numbers, and email address for the payee. |
| Payment Method | Select a payment method. The following options are available. |
| Currency | Select a currency for transactions to this payee. |
| These fields can be used to enter any additional information related to the payee. | |
|
Note: Only General Fields that have been configured with a custom label are displayed. For additional information on the Custom Labels feature, see |
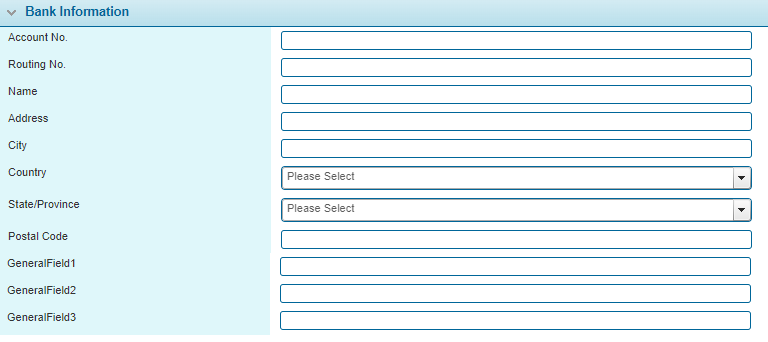
The Bank Information panel is displayed for users who have been assigned the appropriate security role(s).
| Account No. | Enter the bank account number for transactions with this company. |
| Routing No. | Enter the routing number identifying the bank. |
| Name | Enter the name of the bank. |
| Address Information | Enter the full address of the bank. |
| GeneralField1 / GeneralField2 / GeneralField3 | These fields can be used to enter any additional information related to the bank. |
|
Note: Only General Fields that have been configured with a custom label are displayed. For additional information on the Custom Labels feature, see |
If the Claim Parties window is closed without saving, the newly created company has still been saved within the system and can be added to the claim at a later time.
Editing a Claim Party From Within a Claim
- In the Claim Parties widget, click the name of a claim party. The Claim Parties window opens.
- Click Edit Party to make changes to the Claim Party entry for the party, click Save & Close to save the changes and close the window, or click Close to close the window without saving.
- On clicking Edit Party, the Claim Parties window opens.
- Make any necessary changes. Fields marked with a red asterisk * are required.
- Click Save & Close to save the changes and close the window, or click Close to close the window without saving the changes.
|
Displays the name of the claim party. |
|
|
Displays the role of the selected party. |
|
|
An external claim number can be provided as a reference for the claim party. |
| Company Name | Enter the name of the company. |
| Company Code | Enter a code to identify the company. |
| Company Type | Select the company type from the list of industry presets. The following options are available. |
| Associated Company | Some companies may be subsidiaries or partners of other companies. Select the parent or primary company in the association. This association will be displayed when attaching companies to a claim. |
| Contact Name | Enter the name of the primary contact for the company. |
| Address and Contact Information | Enter the full address, phone and fax numbers, and email address for the company. |
| GeneralField1 / GeneralField2 / GeneralField3 | These fields can be used to enter any additional information related to the company. |
|
Note: Only General Fields that have been configured with a custom label are displayed. For additional information on the Custom Labels feature, see |
|
| Payment Method | Select the preferred payment method for this company. |
The Payee Information panel is displayed for users who have been assigned the appropriate security role(s).
| Reference No. | Enter a code to identify the payee. |
| Name | Enter the payee name. |
| Address and Contact Information | Enter the full address, phone and fax numbers, and email address for the payee. |
| Payment Method | Select a payment method. |
| Currency | Select a currency for transaction to this payee. |
| GeneralField1 / GeneralField2 / GeneralField3 | These fields can be used to enter any additional information related to the payee. |
|
Note: Only General Fields that have been configured with a custom label are displayed. For additional information on the Custom Labels feature, see |
The Bank Information panel is displayed for users who have been assigned the appropriate security role(s).
| Account No. | Enter the bank account number for transactions with this company. |
| Routing No. | Enter the routing number identifying the bank. |
| Name | Enter the name of the bank. |
| Address Information | Enter the full address of the bank. |
| GeneralField1 / GeneralField2 / GeneralField3 | These fields can be used to enter any additional information related to the bank. |
|
Note: Only General Fields that have been configured with a custom label are displayed. For additional information on the Custom Labels feature, see |
|
Marks the company as active and available for use. If unchecked, the company will no longer be available for new claims. |
|
|
Identifies the date and time the company was created, and the user who created it. |
|
|
Identifies the last date and time the company was changed, and the user who made the changes. |
Note: Editing the claim party updates the stored Claim Party entry for that party, affecting all existing claims to which the party is attached.
